Today, in the world of various cannabis accessories, what we are talking about today is the rolling tray. For those who like to roll their own cigarettes, the rolling tray is an essential tool, especially for beginners. , owning a rolling tray can save you a lot of trouble. Although there are many styles of rolling trays in smoke shops for you to choose from, we prefer to make them by ourselves, because DIY rolling trays can not only customize your own personalized design but also It will bring a a unique sense of satisfaction. I believe there are many people who have the same idea as me. For this reason, I specially wrote this tutorial on How To Make A Rolling Tray. So let’s dive into this step-by-step guide
$21.90Original price was: $21.90.$9.90Current price is: $9.90.
What are rolling trays made of?
There are many materials to choose from when making your own Rolling Tray, so before starting this journey, you need to determine what materials you want to choose to make your Rolling Tray.
Below I will introduce you to the five most common materials for making Rolling Tray, hoping to help you:
Wood – There are many common materials for making wooden rolling pallets, such as maple, black walnut, bamboo, etc. These woods give people a natural and elegant feel, and different woods can present different aesthetics. What I like most about the wooden Rolling Tray is that it can be completely customized according to my design to meet my different design needs.
Metal – Commonly used metals include aluminum and stainless steel. Stainless steel has anti-corrosion properties and is not prone to rust. This allows the metal pallet to be used longer and reduces the frequency of replacement due to material aging.
Plastics – There are many types of plastics including acrylic, ABS, silicone, etc. Plastic is cheap and easy to mold, and can be made thin, light and non-slip.
Ceramic – The surface of the rolling tray made of ceramics is exquisite and smooth, especially the fired enamel layer which gives it a satin-like texture. In addition, the ceramic pattern can show you an elegant and beautiful appearance and is easy to clean afterwards . You just need to wipe it gently with a damp cloth to clean it
So which material is the best choice when we make Rolling Tray?
Previously we listed for you the advantages of making Rolling Tray from a variety of materials. Here we prefer to use wood to make it, because in order to achieve the best possible rolling experience, using wood to make it not only avoids giving off odors like those from silicone or metal
It also has a natural woody fragrance, and using wood to make it is easier than other materials, especially if you have all the materials you need, you can complete it in a few hours. Easier for novices, let’s start in detail Production steps
What do you need to make a DIY rolling tray?
We need to prepare the following tools during the production process. These tools can give us great help during the production process.
Wood board, here we choose black walnut because it is the easiest material for me to find Measuring Tape or Ruler Sandpaper Paintbrushes -various varnishes -saw
First, we measure and mark the desired dimensions for your tray using a ruler and pencil. Next, use a saw to carefully cut the wood along these markings. If you also need space for rolling paper, grinders or other accessories, then you can make corresponding compartments during this period. You need to measure and mark their placement on the tray’s surface. Using a drill or chisel, carefully carve out these compartments to your desired depth.
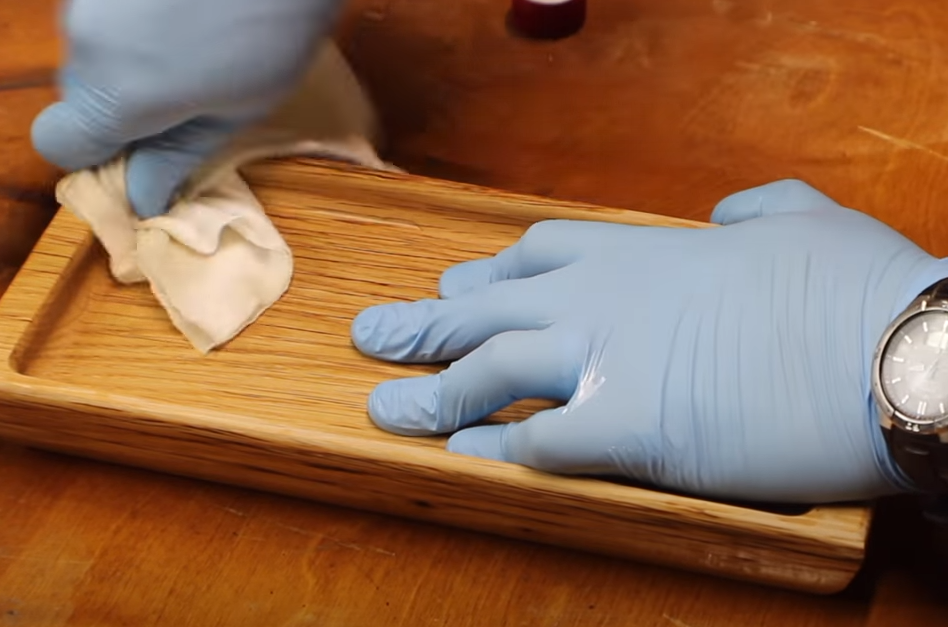
You apply varnish based on personal preference. Many people may wonder why we need to varnish in this process. The reason is simple: Once you varnish the rolling tray, it forms a protective layer that prevents the wood from absorbing moisture and warping.
Proper painting can make the wood surface smoother and more delicate, improve the gloss, and give a sense of high-end quality. For this reason, we generally recommend 2-3 layers of varnish, which is enough.
How do you paint a rolling tray?
Clean and dry your tray thoroughly. Apply 2-3 thin coats of primer spray paint to create a smooth base. Allow to fully dry between coats.
Think of a design and lightly sketch it out with a pencil. Some ideas are trippy patterns, nature elements, music motifs, or cosmic themes.
Use painter’s tape to mask off any areas you want to keep primer colored. This helps create clean lines.
With acrylic craft paints, start filling in your design using brushes and rollers. Allow sufficient drying time between coats.
Once the design is complete, seal it with 1-2 coats of clear acrylic sealer spray to protect it. Let dry fully before use.
You can utilize as much imagination as you like to create the Rolling Tray, depending on what you like. When you finally get the Rolling Tray of your own design, the sense of accomplishment is unparalleled.